2008年10月7日 星期二
Debian cacti安裝
- 安裝cacti
debina:~# apt-get install cacti
安裝過程中會要求輸入mysql的root密碼,cacti並會建立一個名為cacti的資料使用者,並設定其密碼 - 打開瀏覽器http://www.myurl.org/cacti,按Next繼續安裝,cacti第一次安裝完成預設帳密為admin/admin,登入後系統會要求更改admin密碼,更改後即可登入cacti
2008年10月6日 星期一
Debian Awstats
- 安裝awstats
debian:~# apt-get install awstats - 設定aswtats
debian:~# vi /etc/awstats/awstats.confLogFile="/var/log/apache2/access.log"
SiteDomain="hft.tweetylny.org"
LogFormat=1
save&exit
debian:~# vi /etc/cron.d/awstats
fix
0,10,20,30,40,50 * * * * www-data [ -x /usr/lib/cgi-bin/awstats.pl -a -f /etc/awstats/awstats.conf -a -r /var/log/apache/access.log ] && /usr/lib/cgi-bin/awstats.pl -config=awstats -update >/dev/null
to
0,10,20,30,40,50 * * * * www-data [ -x /usr/lib/cgi-bin/awstats.pl -a -f /etc/awstats/awstats.conf -a -r /var/log/apache2/access.log ] && /usr/lib/cgi-bin/awstats.pl -config=awstats -update >/dev/null
save & exit
debian:~# ln -s /usr/share/awstats/icon /var/www/awstats-icon - 第一次手動執行
debian:~# /usr/lib/cgi-bin/awstats.pl -config=awstats -update >/dev/null - 瀏覽器輸入網址
http://www.myurl.org/cgi-bin/awstats.pl Debian預設
cron檔放在 /etc/cron.d/awstats 每10分鍾更新一次
Debian MRTG安裝
- 安裝MRTG
debian:~# apt-get install snmp snmpd mrtg
debian:~# cp /etc/snmp/snmpd.conf /etc/snmp/snmpd.conf.bak
debian:~# rm /etc/snmp/snmpd.conf
debian:~# touch /etc/snmp/snmpd.conf
debian:~# vi /etc/snmp/snmpd.conf
add
rocommunity public
save&exit
debian:~# /etc/init.d/snmpd restart - 測試snmp是否正常啟動
debian:~# snmpwalk -c public -v 1 localhost - 設定/etc/mrtg.cfg
add&fix
WorkDir: /var/www/mrtg
EnableIPv6: no
WorkDir: /var/www/mrtg
Target[eth0]: \eth0:public@localhost:
Refresh: 600
Interval: 5
MaxBytes[eth0]: 1310720
Language: ansi
options[_]: bits, growright, transparent, printrouter, pngdate
PNGTitle[eth0]: tweetylny-tw.org
XScale[eth0]: 1.8
YScale[eth0]: 1.8
LegendO[eth0]: eth0 out flow
LegendI[eth0]: eth0 in flow
Colours[eth0]: 1#FFCC00,2#336699,3#FF0000,4#00FF00;
SetEnv[eth0]: MRTG_INT_IP="123.204.90.138" MRTG_INT_DESCR="eth0" EMAIL="root@tweetylny.org" HOST="tweetylny.org"
Title[eth0]: tweetylny.org
PageTop[eth0]: <h1>tweetylny.org</h1>
save&exit - 執行mrtg,建立index.html
debian:~# mrtg /etc/mrtg.cfg 執行三次
debian:~# indexmaker -output=/var/www/mrtg/index.html -title='tweetylny.org Traffic Info' /etc/mrtg.cfg - Debain預設的值
主要網站是掛在/var/www/mrtg
cron檔放在/etc/cron.d/mrtg 5分鍾更新一次
專題相關
http://blog.roga.tw/2007/09/07/494/
http://bbs.mychat.to/read.php?fid=164&tid=476780
cacti
awstats
mrtg
http://wiki.debian.org/Manual-Howto#head-af0cf2b4461252ac231800c12fa5d28f3a04e166
http://cha.homeip.net/blog/archives/2005/01/sendmail_mailsc.html
http://mydebian.freeblog.hu/archives/2006/12/11/postfix__amavisd-new__spamassassin__spamc__clamav_--_on_debian_etch/
http://bbs.mychat.to/read.php?fid=164&tid=476780
cacti
awstats
mrtg
http://wiki.debian.org/Manual-Howto#head-af0cf2b4461252ac231800c12fa5d28f3a04e166
壓力測試參考資料1
Mail Server 壓力測試參考資料 1
Mail Server 壓力測試(郵件病毒)參考文件 2
壓力測試實錄分享參考文件
http://cha.homeip.net/blog/archives/2005/01/sendmail_mailsc.html
http://mydebian.freeblog.hu/archives/2006/12/11/postfix__amavisd-new__spamassassin__spamc__clamav_--_on_debian_etch/
2008年10月1日 星期三
osTube安裝設定
- 首先將apt的來源加入multimedia支援
debian:# vi /etc/apt/sources.list
add
deb http://www.debian-multimedia.org stable main
save&exit - 增加multimedia的gpgkey,並更新apt列表,安裝gpgkey前請先檢查bzip2安裝了沒
debian:~# wget http://debian-multimedia.org/gpgkey.pub -O - | apt-key add - && apt-get install debian-multimedia-keyring
debian:~# apt-get update - 安裝套件mplayer、mencoder、ruby、flvtools2、php5-cli、php5-gd
debian:~# apt-get install mplayer mencoder ruby php5-cli php5-gd
debian:~# wget http://rubyforge.org/frs/download.php/17497/flvtool2-1.0.6.tgz
debian:~# tar zxvf flvtool2-1.0.6.tgz
debian:~# cd flvtool2-1.0.6
debian:~/flvtool2-1.0.6# ruby setup.rb config;ruby setup.rb setup;ruby setup.rb install
debian:~# /etc/init.d/apache2 restart - 到osTube網站註冊,並下載osTube_2.2_Community_Edition_osTube_community_edt_2.2.tar.gz
debian:~# mkdir /var/www/ostube
debian:~# tar zxvf osTube_2.2_Community_Edition_osTube_community_edt_2.2.tar.gz -C /var/www/ostube - 建立ostube的mysql資料庫,並將指定資料庫使用者權限
- 打開瀏覽器,輸入ostube的網址http://www.myurl.org/ostube開始進行安裝
安裝到 "Error! (one last setting needed..)"時
debian:/var/www/ostube# touch includes/config.php
debian:/var/www/ostube# chmod 777 includes/config.php
按下F5重整繼續安裝,出現Congratulations就代表安裝完成 - 設定檔案上傳的位置及上傳的大小限制,單位為byte,1GB =1024 MB = 1048576 KB = 1073741824 Byte,並將ostube/cgi-bin下的所有檔案複製到/usr/lib/cgi-bin
debian:~# cd /var/www/ostube/cgi-bin/
debian:~# vi uu_default_config.pm (照上面的修改)
fix
upload_dir => $ENV{'DOCUMENT_ROOT'} . '/ostube/media/tmp/',
redirect_url => 'http://' . $ENV{'SERVER_NAME'} . '/ostube/upload.php',
path_to_upload => 'http://'. $ENV{'SERVER_NAME'} . '/ostube/uploads/',
max_upload => 509715200,
save&exit
debian:/var/www/ostube# cp cgi-bin/* /usr/lib/cgi-bin/ - 修正convert.php,將下列程式碼加上註解#
debian:/var/www/ostube# vi convert.php
fix
if (!$mplayer_rc1) {
#$conversionString = str_replace("-lavfopts i_certify_that_my_video_stream_does_not_use_b_frames ", "", $conversionString);
} - 中文化
懶人法
debian:/var/www/ostube# rm -rf languages/english/english.ini
debian:/var/www/ostube# wget http://203.68.253.130/~yungzai/ostube2.2/english_2.2.ini;mv english_2.2.ini languages/english/english.ini
debian:/var/www/ostube# wget http://203.68.253.130/~yungzai/ostube2.2/admin.ini;mv admin.ini languages/english/admin.ini
debian:/var/www/ostube#iconv -f BIG5 -t UTF-8 languages/english/admin.ini.1 > admin.ini
debian:/var/www/ostube# rm -rf languages/english/admin.ini.1
自建語系法(怕麻煩者勿用)
debian:/var/www/ostube# cd languages/
debian:/var/www/ostube/languages# cp -r english zh-TW
debian:/var/www/ostube/languages# cd zh-TW
debian:/var/www/ostube/languages/zh-TW# vi settings.php
fix
$settings['iso_code'] = "zh-TW";
$settings['title'] = "繁體中文";
$settings['locale'] = array('zh-TW','tw','Taiwan');
save&exit
debian:/var/www/ostube/languages/zh-TW# rm english.ini
debian:/var/www/ostube/languages/zh-TW# wget http://203.68.253.130/~yungzai/ostube2.2/english_2.2.ini;mv english_2.2.ini zh-TW.ini
debian:/var/www/ostube/languages/zh-TW# wget http://203.68.253.130/~yungzai/ostube2.2/admin.ini
debian:/var/www/ostube/languages/zh-TW#iconv -f BIG5 -t UTF-8 languages/english/admin.ini.1 > admin.ini
debian:/var/www/ostube/languages/zh-TW# rm -rf languages/english/admin.ini.1
debian:/var/www/ostube/languages/zh-TW# cd /var/www/ostube/templates/default/images
debian:/var/www/ostube/templates/default/images# cp -r english zh-TW
debian:/var/www/ostube/templates/default/images# cd zh-TW
debian:/var/www/ostube/templates/default/images/zh-TW# wget http://video.hlps.tcc.edu.tw/templates/default/images/zh-TW/zh-TW.gif
debian:~# cd /var/www/ostube/templates/default/mail
debian:/var/www/ostube/templates/default/mail# cp english -r zh-TW
由於新建一個語系,在分類上要先在English模式下,將中文的分類名稱加好再做轉換
或是將以下sql指令匯入資料庫
INSERT INTO `ost_channels2language` (`id`, `channel_id`, `channel_name`, `channel_desc`, `channel_language`) VALUES
(25, 11, '趣味', NULL, 'zh-TW'),
(26, 9, '運動', NULL, 'zh-TW'),
(27, 3, '競賽', NULL, 'zh-TW'),
(28, 5, '教育', NULL, 'zh-TW'),
(29, 4, '電影', NULL, 'zh-TW'),
(30, 1, '卡通', NULL, 'zh-TW'),
(31, 7, '新聞', NULL, 'zh-TW'),
(32, 8, '旅遊', NULL, 'zh-TW'),
(33, 6, '流行', NULL, 'zh-TW'),
(34, 12, '科技', NULL, 'zh-TW'),
(35, 10, '動物', NULL, 'zh-TW'),
(36, 2, '奇異', NULL, 'zh-TW');
在Configuration->General Settings->Default Language選擇為繁體中文,至於管理者的語系要到資料庫下ost_users資料表的users_language,將管理者的users_language改成zh-TW即可 - mysql中文utf8設定,增加@mysql_query("SET NAMES utf8", $this->connection);
debian:/var/www/ostube# vi includes/class.database.php
if(!$this -> connection = @mysql_connect($DBhost,$DBuser,$DBpass)) {
if($this->debug) die("Error: Can not connect to database - " . $DBhost);
unset($this);
return false;
} else {
@mysql_query("SET NAMES utf8", $this->connection);
$this->connected = true;
} - 因為中文化檔是澎湖的老師修改的,所以要對中文化檔的參數做修正
debian:~# vi /var/www/ostube/languages/zh-TW/zh-TW.ini
send2friend_subject
debian~# vi /var/www/ostube/languages/zh-TW/admin.ini
tosite - convert error debug
debian:~# cat /var/www/ostube/conversion.log
觀察錯誤訊息,再去對convert.php...等檔案做設定
2008年9月30日 星期二
Debian ssh_auth設定
- Linux(Server) to Linux(Client)
- client端設定
建立公開金鑰
user@debian:~$ ssh-keygen -t rsa - server端設定
將client公開金鑰加入至authorized_keys檔案內
debian:~# scp user@remote_ip:/home/user/.ssh/id_rsa.pub ~/.ssh/authorized_keys - client端即可利用user的帳號連線至 root@server_ip,即可直接登入,不用密碼驗證
- client端設定
- WinXP(Client) to Linux(Server)
- WinXP Client端設定
下載puttygen
http://the.earth.li/~sgtatham/putty/latest/x86/puttygen.exe
將puttygen打開,1.選擇key要的編碼 2.按下generate產生key 3.在3的區域內移動滑鼠亂數產生key
產生key....
1.key passphrase建議不填,填了會多一層登入密碼 2.儲存公鑰及私鑰 3.產生的公鑰,將其複製起來
- Linux(Server)設定
如果.ssh目錄不存在,需自行建立
debian:~# vi ~/.ssh/authorized_keys
將puttygen產生的公鑰貼上去 - 在WinXP(Client)利用putty載入驗證並登入

1.點選SSH的選項 2.再選Auth 3.按Browse選取puttygen產生的"私鑰"
最後按下Open,輸入帳號root直可直接登入
- WinXP Client端設定


Debian NIS安裝設定
- 安裝NIS
debian:~# apt-get install nis - Client端 設定
debian:~# vi /etc/passwd
add
+::::::
debian:~# vi /etc/group
add
+:::
debian:~# vi /etc/shadow
add
+::::::::
debian~:# vi /etc/yp.conf
add
ypserver ypserver.myurl.org
或利用ypdomainname新增 - Server端設定
debian~:# vi /etc/default/nis
fix
NISSERVER=master
debian~:# /usr/lib/yp/ypinit -m
* NIS Troubleshooting
(1) 檢查 services 是否有跑起來 (ypserv, ypbind)
# rpcinfo -p localhost
or
# rpcinfo -u localhost ypserv
# rpcinfo -u localhost ypbind
(2) 檢查設定是否有誤, 至 nis client console 前, 登入成 root
# su - username
若是可以, 表示 /etc/passwd, /etc/shadow, /etc/group, /etc/nsswith.conf
可能有錯誤
Debian NFS設定
- 安裝NFS
debian:~# apt-get install nfs-common nfs-kernel-server portmap - Server端設定
debian:~# vi /etc/exports
add
/mnt/sahre 140.134.1xx.1xx(rw,sync,subtree_check) hostname(ro,sync,subtree_check)
參數設定
ro 只允許讀取
rw 允寫讀寫
sync 檔案同步
async 同步前回應
subtree_check 如果共享/usr/bin之類的子目錄時,強制NFS檢查父目錄的權限
no_subtree_check 不檢查
all_squash 所有用戶皆為匿名者身份
anonuid 匿名者使用哪一個帳號的 UID
anongid 匿名者使用哪一個帳號的 GID - 重新載入設定的方式
debian:~# /etc/init.d/nfs-kernel-server restart
或是執行指令
debian:~# exportfs -r - 遠端掛載
debian:~# mount -t nfs 140.134.1xx.1xx:/mnt/share remote - 卸載
server
debian:~# exports -au
client
debian:~# umount remote - 開機自動掛載設定
debian:~# vi /etc/fstabadd
/mnt/sahre ip_hostname(rw,async,all_squash,anonuid=1000,anongid=1000) - 防火牆的設定
nfs使用到的port為2049(nfs-kernel-server)、111(portmap)及一個1024以下的隨選port(rpc.mountd),要做到防火牆設定必需把rpc.mountd的port固定住
debian:~# vi /etc/default/nfs-kernel-server
fix
RPCMOUNTDOPTS="--port 32767" #指定port
save & exit
設定iptables
iptables -A INPUT -i $nic_output -p tcp -s source_ip --dport 111 -j ACCEPT
iptables -A INPUT -i $nic_output -p udp -s source_ip --dport 111 -j ACCEPT
iptables -A INPUT -i $nic_output -p tcp --dport 2049 -j ACCEPT
iptables -A INPUT -i $nic_output -p tcp --dport 32767 -j ACCEPT - 安裝autofs
debian:~# apt-get install autofs要掛載遠端機器 hostname 上的 /directory 目錄到您機器的 /mnt/nfs/share 掛載點
debian:~# vi auto.master
add/mnt/nfs /etc/auto.nfs --timeout 60
save&exitdebian:~# vi /etc/auto.nfs
add

share  -rw,soft,intr,rsize=8192,wsize=8192 hostname:/directory

save&exit

debian:~# /etc/init.d/autofs restart
之後只要你嘗試進入 /mnt/nfs/share 目錄,autofs 即會自動幫你掛載該 nfs 目錄
- 除錯參考
當/etc/exports設定的權限,不符合client端的來源時,則會出現錯誤訊息如下
mount: hostname:/dir failed, reason given by server: Permission denied
然而必須注意的是,若在nfs server的/etc/hosts內有設定IP與hostname的對照,則nfs會先把來源IP轉換成hostname,再與/etc/exports內的設定作對照,若此時/etc/exports的設定使用IP而非hostname,則會產生無法匹配的情況,因此而出現,雖然來源IP在/etc/exports已正確設定,卻仍然發生Permission denied的怪異現象
解決方案是在/etc/exports內採用hostname,避免使用IP - 老師上課的資料
NFS
NFS,Network File System 網路檔案系統,是 UNIX/Linux 與 UNIX/Linux 之間檔案分享的一種服務。
設定前,請先檢查通訊協定 RPC(Remote Procedure Call)中的 portmapper 是否正常運作?
查詢 RPC 服務,請使用 rpcinfo 指令。# rpcinfo -p
安裝
portmapper 安裝 # apt-get install portmap
NFS 安裝 # apt-get install nfs-kernel-server
設定
NFS 主要設定檔為 /etc/exports 檔案,內容格式相當簡單,檔案內各欄位如下說明:
- 欄位#1 → 要分享的檔案目錄實際路徑。
- 欄位#2→ 分享的對象,後面緊接著括號內為對象可用權限)。多對象則使用空格分開。
範例:
/tmp *(rw,sync)
啟動
# /etc/init.d/nfs-kernel-server start
權限說明
- ro 唯讀
- rw 可讀可寫入
- no_root_squash 如果為 root 用戶,則具有該目錄的 root 權限。(不建議使用)
- root_squash 如果 root 用戶,則將身份變成匿名者身份。
- all_squash 所有用戶皆為匿名者身份。
- anonuid 匿名者使用哪一個帳號的 UID。
- anongid 匿名者使用哪一個帳號的 GID。
- sync 資料同步寫入。
- async 資料先寫入記憶體中。
相關指令
- showmount 列出指定主機分享出來的資源清單
# showmount -e
# showmount -e Teacher
# showmount -e 140.134.210.131 - exportfs 匯出 /etc/ports 內容給 NFS Server
# exportfs -r
2008年9月26日 星期五
Debian DNS master/slave 設定
- 在申請網址的網站,輸入有關DNS主機的資料
ex:
ns1.myurl.org 123.122.122.1 <-master DNS
ns2.myurl.org 123.122.122.2 <-slave DNS - master DNS設定
/etc/bind/zones/myurl.org.zone必需先行設定好NS、A紀錄…等設定
debian:~# vi /etc/bind/named.conf.local
fix
zone "myurl.org" {
type master;
file "/etc/bind/zones/myurl.org.zone";
allow-transfer {123.122.122.2;};//slave dns ip
};
save&exit
debian:~# /etc/init.d/bind9 restart - slave DNS設定
slave DNS 不用事先建立/etc/bind/zones/myurl.org.zone,在重新啟動後,會自動建立/etc/bind/zones/myurl.org.zone檔案
debian:~# vi /etc/bind/named.conf.local
fix
zone "myurl.org" {
type slave;
file "/etc/bind/zones/myurl.org.zone";
masters {123.122.122.1;}; //master dns ip
};
save&exit
debian:~# /etc/init.d/bind9 restart
Debian Samba 安裝設定
- 安裝Samba
debian:~# apt-get install samba
debian:~# apt-get install samba-client
debian:~# apt-get install smbfs - 設定samba
Server--
|----share (/mnt/share),可讓任何讓上傳修改公用資料夾
|----tony (/home/tony),僅讓tony可以登入此資料夾
debian:/etc/samba# vi smb.conf
add
[global]
security = SHARE
[share]
comment = share
path = /mnt/share #必需設定為777才能讓任何人進入
read only = No
guest ok = Yes
[tony]
comment = tony
path = /home/tony #目錄必需讓vaild users的指定的使用者
valid users = tony #有權限存取
read only = No
only user = Yes
save&exit
debian:~# /etc/init.d/samba restart
設定使用者帳號密碼,本機帳號必需存在才能設定其smb的密碼
debian:~# smbpasswd tony
New SMB password:
Retype new SMB password: - 測試
Linux:
debian:~# smbclient -L ip 列出分享資料夾
debian:~# smbclient //ip/tony 測試密碼是否可以正常使用
WinXP:
開啟網路的芳鄰,或是直接在開始->執行輸入"\\ip"做測試,如要斷線請選上方工具->中斷網路磁碟機即可 - 在Debian中利用smbmout將samba掛載至資料夾中
解決語系的問題
debian:/etc/samba# vi smb.conf
add
[global]
dos charset = CP950
unix charset = UTF8
display charset = UTF8
sav&exit
debian:~# /etc/init.d/samba restart
debian:~# smbmount //ip/share /mnt/tony_share -o iocharset=utf8,codepage=cp950,dmask=777,fmask=777
iocharset及codepage為語系設定,dmask為目錄權限,fmask為檔案權限 - 老師的教學資料
Sambs 與 NetBIOS over TCP/IP
在 UNIX/Linux 環境中,主機與主機的檔案分享可以透過 NFS(Network File System)進行,但若是環境中還有 Windows 系統,則因 Windows 系統未支援 NFS 而無法達到檔案及印表機的資源分享。Samba Server 是一套好軟體,它可以建立 Linux 與 Linux 之間或是 Linux 與 Windows 之間的檔案與印表機分享,及所謂的『網路芳鄰』。
Windows 環境下的網路芳鄰使用 NetBIOS 通訊協定。NetBIOS 通訊協定為 IBM 所創造與發展,用在區域網路環境中機器與機器連線的基本通訊協定,後因效能不佳而放棄繼續研發與使用。Microsoft 在發展 Windows 95 系統時,將 NetBIOS 通訊協定應用在網路芳鄰,讓 Windows 系統透過該通訊協定達到資源方想的目的。
不過,NetBIOS 除了效能不佳外,始終存在著無法跨越路由問題。在網際網路風行後,TCP/IP通訊協定嚴然成為機器通訊的最佳方式,而機器與機器間的資源分享,也因為網路連線的範圍擴大,需要一套能夠跨越路由的通訊協定。於是將 NetBIOS 放到 TCP/IP 上,搭載以 TCP/IP 為基礎的通訊,讓 NetBIOS 可以跨越路由,稱為 NetBIOS over TCP/IP。
工作群組與網域
網路作主要的用途是進行資源分享與訊息交換,最小的網路是將兩台電腦以電纜線連接來達到資源分享。一般的小型企業電腦數目不多,透過簡單的電纜或集線器即可形成一個工作群組,在工作群組內的機器都擁有資源釋出分享的能力,而為了安全,美台機器會為分享出來的資源作密碼保護,要存取者必須獲得密碼後登入來可以使用資源。在不同機器會有不同的資源與密碼,資源存取者需要記憶美台不同機器的資源密碼,顯然是很不方便。
網域的出現,解決了上述的問題。在網域中會有一部機器擔任網域的主控站(稱為 PDC,Primary Domain Controller),PDC 將網域中的帳號與資源進行集中的管理,工作端只需要登入到網域中,便可以依據權限進行資源存取。
設定
Samba Server 一般預設的設定目錄為 /etc/samba,設定檔是 smb.conf,在設定檔案內,主要要設定伺服器啟動的相關設定以及資源分享兩部份。
[Global]
* workgroup = fcu_nw #設定群組或網域名稱
* server string = Samba Server #主機的註解
* security = user #設定 Samba 扮演的角色(share、User、Server、Domain、AD)
* encrypt passwords = true #啟用密碼加密
* passdb backend = tdbsam #新版 Samba 使用者帳號存放的方式以資料庫方式存在
* smb passwd file = /etc/samba/smbpasswd #使用舊版的使用者帳號存放的方式,指定檔案路徑及名稱。
* obey pam restrictions = yes #使用 PAM 認證機制
* unix password sync = no #Windows 與 Linux 密碼同步化
* passwd program = /usr/bin/passwd %u #密碼變更指令
* passwd chat = *Enter\snew\sUNIX\spassword:* %n\n *Retype\snew\sUNIX\spassword:* %n\n *password\supdated\ssuccessfully* . #密碼變更交談方式內容
* pam password change = no #密碼變更是否使用 PAM 而不用 passwd program
* domain master = yes #指定 Samba 為 PDC
* domain logons = yes #使用網域登入方式
* logon path = \\%N\profiles\%U #用戶登入後所使用的 Profile 放置路徑
* logon drive = H: #用戶登入後自動將家目錄連結成指定的磁碟機
* logon home = \\%N\%U #用戶登入後的使用者家目錄
* logon script = logon.cmd #用戶登入後執行的程序稿
* wins support = no #是否讓 Samba 當成 WINS Server
* wins server = 192.168.1.1 #指定使用哪一台 WINS Server(與 wins support 只能二選一)
* local master = yes #為工作群組角色時,是否作為 Local Master。
* os level = 33 #作業系統等級 (95->16、NT Workstation->32、NT Server->64)
* add user script = /usr/sbin/adduser –quiet –disabled-password –gecos 「」 %u #新增用戶的指令
* interfaces = 127.0.0.0/8 eth0 #指定 Samba 在哪些介面與 IP 監聽
* host allow = 192.168.10. 127. 140.134.210. #允許哪些 IP 主機連線
* socket options = TCP_NODELAY #指定伺服器與用會對話介面
* name resolve order = lmhosts host wins bcast #主機名稱解析方式的順序
* dns proxy = no #是否使用 DNS 作名稱解析
[Share]
* [Temp] #資源分享的名稱
* comment = Test Share Directory #註解
* path = /tmp #實際目錄路徑
* public = yes #是否為公用資料夾
* browseable = yes ##是否可被瀏覽
* printable = no #是否為印表機圖示
* writable = yes #是否可寫入
* read olny = no #是否只能讀取
* guest ok = no #是否允許來賓帳號存取
設定檔的語法檢查
Samba 提供 testparm 指令來作設定檔的語法檢查。
# testparm
服務的啟動
Samba Server 啟動時有兩項服務會議起啟動,一項是 Samba 本身(smbd),另一項是 NetBIOS 通訊協定(nmbd)。
# /etc/init.d/samba restart
使用者帳號的建立
* 必須是系統內已經存在的使用者帳號
* 根據設定檔可以選擇使用新版的資料庫來存放使用者帳號。
* 若設定檔內指定使用 smb passwd file 來存放設定檔,則需要事先建立指定的 smbpasswd 檔案。
[使用資料庫存放]
1. 設定檔案內指定 passdb backend = tdbsam。
2. 重新啟動 Samba # /etc/init.d/smbd restart。
3. 以 smbpasswd 建立使用者 # smbpasswd -a user01。
[使用 smb passwd file]
1. 設定檔案內指定 smb passwd file = /etc/samba/smbpasswd。
2. 重新啟動 Samba # /etc/init.d/smbd restart。
3. 以 smbpasswd 建立使用者 # smbpasswd -a user01。
Client 端的連接
[文字模式下使用 smbclient 指令]
* # smbclient -L localhost 列出主機清單
* # smbclient -L //teacher 列出 teacher 主機分享的資源清單
* # smbclient //Teacher/Temp -U user01 以 User01 登入 Teacher 主機存取分享的 Temp 檔案資源
* 登入後操作指令同 FTP。
[X 視窗環境下使用 LinNeighorhood]
* 安裝 # apt-get install linneighorhood
* X 視窗下的開始選單選擇程式啟動。
[Windows 系統下直接使用網路芳鄰]
海角七號
 這是我第一次進電影院看國片,海角七號藉著60年前未寄達的信和現代的時空所交叉出來的劇情真的是相當的棒!而這也是國片難得一見的音樂電影,歌曲都相當的好聽。
這部片相當的生活化,從一開始男主角阿嘉就說了一句「我操你媽的台北」,片中不少的部份都有一些髒話出現,描述了鄉下地方騎車不戴安全帽...等的社會現象,真的是相當貼近生活...只要是土生土長的台灣人,看了都會有很特別的感覺。
整部片最大的賣點就是有感人的劇情之外,也有非常爆笑的劇情,就像60年前歸國的日本老師對友子的深切的情感,和男、女主角間情感都相當的感人,海灘、彩虹、墾丁讓人覺得相當的美麗,而爆笑的劇情莫過於人間國寶茂伯了,他所說出來的每句話和動作,都讓人覺得相當的好笑,這是我第一次看電影看到大家因為覺得太好笑而鼓掌的,我想如果有人要去看或是二輪片時我會再去看一次吧!因為真的是太讚了!
好片不多說,沒看過的人推薦大家快去看吧^^
2008年9月25日 星期四
Debian openwebmail安裝
- 下載openwebmail套件
debian:~# wget http://www.openwebmail.org/openwebmail/download/debian/owm2.53-2.deb
debian:~# dpkg -i own2.53-2.deb
debian:~# apt-get -f install
debian:~# cd /var/www/openwebmail/
debian:/var/www/openwebmail# mv index.html b_index.html
debian:/var/www/openwebmail# ln -s redirect.html index.html - 檢查/etc/mailname是否為正常的主機名稱,打開瀏覽器輸入http://www.myurl.org/openwebmail
Debian squirrelmail安裝
- 安裝squirrel
debian~:# apt-get install squirrelmail
debian~:# apt-get install squirrelmail-locales
debian~:# apt-get install squirrelmail-decode - 安裝dovecot套件
debian~:# apt-get install dovecot-pop3d dovecot-imapd dovecot-common - 設定dovecot.conf
debian:~# vi /etc/dovecot/dovecot.conf
fix
protocols = imap pop3
save and restart
debian:~# chmod 755 /var/run/dovecot
debian:~# /etc/init.d/dovecot restart - 設定squirrelmail
debian:~# cp /etc/squirrelmail/apache.conf /etc/apache2/sites-enabled/squirrel.conf
debian:~# /etc/init.d/apache2 restart
debian:~# /etc/squirrelmail/conf.pl
select 10.language
set
1. Default Language : zh_TW
2. Default Charset : UTF-8
save - 開啟瀏覽器輸入http://www.myurl.org/squirrelmail
- 如果無法中文化
debian:~# vi /usr/share/squirrelmail/functions/i18n.php
fix
$languages['zh_TW']['CHARSET'] = 'big5';
$languages['zh_TW']['LOCALE'] = 'zh_TW.BIG5';
to
$languages['zh_TW']['CHARSET'] = 'UTF-8';
$languages['zh_TW']['LOCALE'] = 'zh_TW.UTF-8';
Debian mail相關指令
- root收不到信?
debian:~# vi /etc/aliases
aliases列表,左邊為額外設定,右邊為接收的真實帳號
修正列表後要執行postalias指令讓aliases生效debian:~# postalias hash:/etc/aliases
- mail
user@debian:~$ mail username@xxx.xxx.xxx
Subject: (主旨)
(信件內容)
. (結束)
Cc: (副本) - mutt
按c->? 開啟信箱
Debian poxtfix+saslauthd+dovecot
- 安裝相關套件
需要的套件:
apt-get install postfix-tls sasl2-bin libsasl2 libsasl2-modules dovecot-imapd dovecot-pop3d dovecot-common - vi /etc/default/saslauthd
fix
START=yes
MECHANISMS="pam" - 新增smtpd.conf檔案,
vi /etc/postfix/sasl/smtpd.conf
add
pwcheck_method: saslauthd - vi /etc/postfix/main.cf
smtpd_banner = $myhostname ESMTP $mail_name (Debian/GNU)
biff = no
append_dot_mydomain = no
myhostname = mail.myurl.org
mydomain = ns1.myurl.org
myorigin = $mydomain
inet_interfaces = all
mydestination = $mydomain, localhost.$mydomain, localhost
mynetworks = 127.0.0.0/8
smtpd_sasl_auth_enable = yes
smtpd_sasl_security_options = noanonymous
smtpd_sasl_local_domain = $mydomain
broken_sasl_auth_clients = yes
smtpd_sender_restrictions = reject_unknown_sender_domain, reject_unverified_sender
smtpd_recipient_restrictions = permit_sasl_authenticated,permit_mynetworks,reject_unauth_destination - 設定saslauthd
rm -r /var/run/saslauthd/
mkdir -p /var/spool/postfix/var/run/saslauthd
ln -s /var/spool/postfix/var/run/saslauthd /var/run
chgrp sasl /var/spool/postfix/var/run/saslauthd
adduser postfix sasl - 設定dovecot
debian:~# vi /etc/dovecot/dovecot.conf
fix
protocols = imap pop3
listen = *
disable_plaintext_auth = no
mechanisms = plain login - 重新啟動
debian:~# /etc/init.d/saslauthd restart
debian:~# /etc/init.d/postfix restart - 建立測試帳號,測試完後可以移除
debian:~# useradd test//密碼設testpass
debian:~# vi /etc/passwd
fix
test:x:1001:1001::/home/test:/bin/false - start postfix + saslauthd services
debian:~# /etc/init.d/postfix reload
debian:~# /etc/init.d/saslauthd start - 測試SASL telnet認證,先用perl取得驗證碼
perl -MMIME::Base64 -e 'print encode_base64("\0帳號\0密碼");'
會出現驗證碼,ex:dGVzdAB0ZXN0AHRlc3RwYXNz - 對mailserver連線測試,紅色字為要輸入的部份
telnet 127.0.0.1 25
ehlo localhost
you should see something like this:
250-randallbum.net
250-PIPELINING
250-SIZE 10240000
250-VRFY
250-ETRN
250-AUTH LOGIN PLAIN DIGEST-MD5 NTLM CRAM-MD5
250-AUTH=LOGIN PLAIN DIGEST-MD5 NTLM CRAM-MD5
250-ENHANCEDSTATUSCODES
250-8BITMIME
250 DSN
AUTH PLAIN dGVzdAB0ZXN0AHRlc3RwYXNz //打入由perl產生的驗證碼
235 2.0.0 Authentication successful
出現驗證成功就代表sasl可以正常運作 - 在client的帳號設定在外寄伺服器要勾選驗證
- 檢查/etc/mailname是否為自己的主機名稱
- dovecot如果無法安裝成功,參考下列網址
http://ubuntuforums.org/showthread.php?t=736419
安裝phpbb3
- 下載phpbb3+中文化
debian:~# wget http://nchc.dl.sourceforge.net/sourceforge/phpbb/phpBB-3.0.2.tar.bz2
debian:~# wget http://www.phpbb.com/files/language_packs_30x/lang_zh_cmn_hant.tar.gz
debian:~# wget http://www.phpbb.com/files/language_packs_30x/subsilver2_zh_cmn_hant.tar.gz
debian:~# wget http://www.phpbb.com/files/language_packs_30x/prosilver_zh_cmn_hant.tar.gz
debian:~# tar jxvf phpBB-3.0.2.tar.bz2 -C /var/www
debian:~# tar zxvf lang_zh_cmn_hant.tar.gz -C /var/www/phpBB3/language/
debian:~# tar zxvf subsilver2_zh_cmn_hant.tar.gz -C /var/www/phpBB3/styles/
debian:~# tar zxvf prosilver_zh_cmn_hant.tar.gz -C /var/www/phpBB3/styles/ - 開啟瀏覽器,輸入phpbb3的網址,語系選擇正體中文,依序安裝就可以了~
http://www.myurl.org/phpbb3
安裝完要將install目錄移除
debian:~# rm -rf /var/www/phpBB3/install
2008年9月24日 星期三
安裝xoops
- 下載xoops
debian:~# tar zxvf xoops-2.0.18.S3-tw-utf8.tgz -C /var/www
debian:~# mv /var/www/xoops-2.0.18.S3-tw-utf8/html /var/www/xoops
debian:~# rm -rf /var/www/xoops-2.0.18.S3-tw-utf8/
debian:~# chmod 777 /var/www/xoops/uploads/
debian:~# chmod 777 /var/www/xoops/cache/
debian:~# chmod 777 /var/www/xoops/templates_c/
debian:~# chmod 666 /var/www/xoops/mainfile.php - 開啟瀏覽器,輸入xoops的網址
http://www.myurl.org/xoops - 依序安裝,都入mysql等設定…OK!
安裝Lifetype
- 下載lifetype套件
debian:~# wget http://prdownloads.sourceforge.net/lifetype/lifetype-1.0.6.tar.bz2?download
debian:~# tar jxvf lifetype-1.0.6.tar.bz2 -C /var/www
debian:~# mv /var/www/lifetype-1.0.6/ /var/www/lifetype
debian:~# chmod 666 /var/www/lifetype/config/config.properties.php - 打開瀏覽器,打入lifetype網址,輸入資料庫相關設定,依照安裝步驟安裝
http://www.myurl.org/lifetype/wizard.php - 在選擇佈景的頁面,記得要選擇正確的語系zh_TW utf-8
- 安裝到最後,要將wizard.php刪除
debian:~# rm -rf /var/www/lifetype/wizard.php
安裝Wordpress
- 下載Wordpress
debian:~# wget http://wordpress.org/latest.tar.gz
debian:~# tar zxvf latest.tar.gz -C /var/www
debian:~# cd /var/www/wordpress
debian:/var/www/wordpress# cp wp-config-sample.php wp-config.php
debian:/var/www/wordpress# vi wp-config.php
fix
define('DB_NAME', 'putyourdbnamehere');//資料庫名稱
define('DB_USER', 'usernamehere'); //使用者名稱
define('DB_PASSWORD', 'yourpasswordhere');//密碼
define('DB_HOST', 'localhost');//主機 - 開啟wordpress的網址,輸入title及e-mail,按著會出現管理帳號及密碼,將密碼複製,然後登入,畫面右上角有Users的連結,進入後再點擊admin連結,最下方修改密碼
- 中文化
debian:~# mkdir /var/www/wordpress/wp-content/languages
debian:~ #wget http://wordpress.kirin-lin.idv.tw/Home/oldfiles/WordPress_zh_TW_2.6.2.zip
debian:~# mv WordPress_zh_TW_2.6.2.zip\?attredirects\=0 WordPress_zh_TW_2.6.2.zip
debian:~# unzip WordPress_zh_TW_2.6.2.zip -d /var/www/wordpress/wp-content/languages/
debian:~# vi /var/www/wordpress/wp-config.php
add/fixdefine ('WPLANG', 'zh_TW');define('DB_CHARSET', 'utf8');define('DB_COLLATE', 'utf8_unicode_ci'); - 更換佈景主題,在後台管理,切換至"設計->佈景主題"頁面,然後,點選取得更多佈景主題的連結去下載自己想要的佈景主題
debian:~# wget http://wordpress.org/extend/themes/download/aeros.1.0.4.zip
debian:~# unzip aeros.1.0.4.zip -d /var/www/wordpress/wp-content/themes/
安裝完成後"設計->佈景主題"頁面,點選安裝的佈景主題,再點右上角的"啟用"即可
安裝php+mysql+phpmyadmin
- 安裝php5+Mysql
debian:~# apt-get install php5
debian:~# apt-get install php5-mysql
debian:~# apt-get install libapache2-mod-php5
debian:~# apt-get install mysql-server
debian:~# apt-get install phpmyadmin - 修改php.ini
debian:~# vi /etc/php5/apache2/php.ini
fix
;extension=mysql.so
to
extension=mysql.so - MySQL設定
Debian MySQL-Server安裝設定 - phpmyadmin
加上網頁驗證
debian:# vi /var/www/phpmyadmin/.htaccess
add
Require valid-user
AuthType Basic
AuthName "phpMyAdmin Setup"
AuthUserFile /var/www/phpmyadmin/.htpasswd
debian:# htpasswd -c /var/www/phpmyadmin/.htpasswd username
New password:
Re-type new password:
Adding password for user username
登入網站
http://myurl.org/phpmyadmin
語系選擇中文 - Chinese Traditional (utf-8)
2008年9月23日 星期二
外匯筆記
- 投資與風險
賭博 50% 50%
投資 70% 30%
控制風險:騎車是一種風險,紅燈右轉是否安全?
外匯不易撼動,元大、京華有設外匯業務但水差高 - 外匯軟體下載
http://www.interbankfx.com/Accounts/Demo/ibsetup.exe- 交易倍數設定1:200,存款額設定10000
- 工具->選項->修改密碼
- 貨弊
USD 美金
CHF 瑞朗
GBP 英磅
JPY 日幣
EUR 歐元
AUD 澳幣
CAD 加幣
USDCHF 以USD1元可以換多少CHF
買賣的價差為水差(Swap)
1.0759-1.0763=0.0004=4 點水差 - 介面設定
放大、縮小
陰陽燭
滑鼠右鍵->技術指標 加入Bollinger Bands,設定如下圖
滑鼠右鍵可以取消網格
W1---週線
D1---日線
H4---4小時線
H1---1小時線
M30--30分鐘
M15--15分鐘
M5---5分鐘
M1--1分鐘 - F9下單
買漲、賣跌
終端機
佣金 經紀人抽的佣金
止損 滑鼠右鍵更改設定, 設定停損
獲利 滑鼠右鍵更改設定, 設定獲利了結
追蹤止損 設定最高獲利,但是其中有下降時會算出一個止損點。若重新上升則止損點往上升
1.4800->1.4875
1.4801->1.4876
BALANCE
CREDIT
EQUITY 目前的金額
Margin 保證金
Free margin
Margin level=Equity/Margin 剩下50%時會自動平倉 - MACD
紅線、白線交叉會往上(不一定) - 作漲
上線往上
下線往下
中線往上
作跌
上線往上
下線往下
中線往下

Debian MySQL-Server安裝設定
- 安裝MySQL-Server
debian:~# apt-get install mysql-server - 啟動MySQL-Server
debian:~# /etc/init.d/mysql start - Client端連線到MySQL-Server
本機
debian:~# mysql -u root -p
遠端
debian:~# mysql -h 140.134.210.131 -u root- p - 資料庫操作
- 在本機以client程式連線
debian:~# mysql -u root -p - 進入後以指令查詢
mysql>show databases;
mysql>create database fcu;
mysql>show databases; - 建立管理者(roor)遠端連線帳號
mysql>GRANT ALL PRIVILEGES ON *.* TO root@"%" IDENTIFIED By "something" WITH GRANT OPTION;
IDENTIFIED By "something" something為密碼 - 增加w01使用者可以使用資料庫wdb權限
mysql>grant all privileges on wdb.* to w01@localhost IDENTIFIED By "1234" - 刷新資料庫
mysql> FLUSH PRIVILEGES;
- 在本機以client程式連線
- 設定my.cnf
debian:~# vi /etc/mysql/my.cnf
fix
#bind-address = 127.0.0.1 - 設定mysql密碼
msyql- u root -P
mysql>set password for root@"%"=password('rootpwd'); - mysql語法教學網站
http://www.hmes.kh.edu.tw/~jona/redhat/mysqlphp/mysqlsyntax.htm
2008年9月22日 星期一
Debian vsftp安裝設定
- 安裝vsftpd
debian:~# apt-get install vsftpd - 設定vsftpd.conf
debian:~# vi /etc/vsftpd.conf
fix
anonymous_enable=NO #取消任意使用者
local_enable=YES #允許本機帳戶登入
write_enable=YES #允許寫入
local_umask=022 #目錄權限
chroot_local_user=YES #限定使用者在其家目錄
banner_files=/etc/ftp_banner #設定使用者登入訊息檔案
詳細設定
debian:~# man 5 vsftpd.conf - 重新啟動vsftp
/etc/init.d/vsftpd restart - 要讓使用者能順利登入,必需注意/home目錄的權限,需設定為755
- ftp指令簡介
bin binery模式
asc ascii模式
cd 切換遠端目錄
lcd 切換本地目錄
put 上傳
get 下載
bye 退出
Debian Apache2設定
- 安裝apache2
debian:~# apt-get install apache2 - 設定使用者個人目錄
debian:~# cd /etc/apache2/mods-enabled/
debian:/etc/apache2/mods-enabled# ln -s ../mods-available/userdir.conf userdir.conf
debian:/etc/apache2/mods-enabled# ln -s ../mods-available/userdir.load userdir.load - 設定VirtualHost
debian:# cd /etc/apache2/sites-enabled
debian:/etc/apache2/sites-enabled# vi 000-default
fix
<VirtualHost *>
ServerAdmin root@myurl.org
ServerName www.myurl.org
DocumentRoot /var/www/
<Directory /var/www/>
Options Indexes FollowSymLinks MultiViews
AllowOverride AuthConfig
Order allow,deny
allow from all
# This directive allows us to have apache2's default start page
# in /apache2-default/, but still have / go to the right place
#RedirectMatch ^/$ /apache2-default/
</Directory>
</VirtualHost>
重啟apache2
/etc/init.d/apache2 restart - 加上htpasswd驗證
需將網站的設定為AllowOverride AuthConfig
debian:~# cd /var/www
debian:/var/www# htpasswd -c .htpasswd username
輸入密碼
debian:/var/www# vi .htaccess
AuthName "Auth"
AuthType Basic
Require valid-user
AuthUserFile /var/www/.htpasswd - 修正apache2重新啟動錯誤
debian:/etc/apache2# vi apache2.conf
add
ServerName localhost
存檔後重啟apache2
#debian:~# /etc/init.d/apache2 restart
Debian DNS設定
- 安裝DNS套件bind9
debian:~# apt-get install bind9 - 申請一個屬於自己的網域,可在http://www.dynadot.com/申請,.org一年只要$2xx台幣,申請完成後設定DNS1及DNS2,需填入domain及ip,如果只有一台測試主機ip相同即可
ns1.myurl.org xxx.xxx.xxx.xxx
ns2.myurl.org xxx.xxx.xxx.xxx - 設定 named.conf.local
debian:~# vi named.conf.local
add
zone "myurl.org" {
type master;
file "/etc/bind/zones/myurl.org";
}; - 建立/etc/bind/zones目錄並將正解檔放至底下便於管理
debian:~# cd /etc/bind
debian:/etc/bind# mkdir zones - 建立myurl.org正解檔,在檔案中沒有加上.會自動補齊myurl.org,所以管理者信箱為root@myurl.org
debian:# vi /etc/bind/zones/myurl.org
add
$TTL 86400
@ IN SOA myurl.org. root (
2008091702 ; Serial
604800 ; Refresh
86400 ; Retry
2419200 ; Expire
86400 ) ; Negative Cache TTL
;
@ IN NS ns1.myurl.org. ;dns1
@ IN NS ns2.myurl.org. ;dns2
@ IN A xxx.xxx.xxx.xxx ;ip
www IN A xxx.xxx.xxx.xxx
sub IN A xxx.xxx.xxx.xxx ;指定子網域ip
sub.myurl.org. IN A xxx.xxx.xxx.xxx ;指定子網域DNS - 設定完成後重新啟動dns
debian:# /etc/init.d/bind9 restart
Debian DHCP server設定
- 安裝dhcp server套件
debian:~# apt-get install dhcpd - 基本設定
指定listen的介面
debian:~# vi /etc/default/dhcp
INTERFACES="eth0"
debian:~# vi /etc/init.d/dhcp
# Defaults
INTERFACES="eth0" - DHCP模式
- 單純DHCP:同一區網內,一電腦為DHCP Server,並單純做IP的指派,介面設定為eth0即可
debian:~# vi /etc/dhcpd.conf
add/fix
option domain-name-servers 140.134.4.1; #設定dns
default-lease-time 600; #設定租約
max-lease-time 7200;
#network/netmask 這邊是用子網路切割140.134.210.128/25
subnet 140.134.210.128 netmask 255.255.255.128 {
range 140.134.210.240 140.134.210.245; #ip範圍
option routers 140.134.210.254; #GATEWAY
option subnet-mask 255.255.255.128; # netmask
option broadcast-address 140.134.210.255; #broadcast
}
"option routers 140.134.210.254;"的設定如果將ip改成DHCP Server的電腦,就會變成DHCP/NAT的模式 - DHCP/NAT:eth0為外網設定eth1為內網,並需將listen的介面改成eth1,並利用iptables做nat的轉換
network--eth0 eth1-- local
debian:~# vi /etc/dhcpd.conf
add/fix
option domain-name-servers 140.134.4.1; #設定dns
default-lease-time 600; #設定租約
max-lease-time 7200;
subnet 192.168.20.0 netmask 255.255.255.0 {
range 192.168.20.101 192.168.20.200; #ip範圍
option routers 192.168.20.1; #GATEWAY,eth1的ip
option subnet-mask 255.255.255.0; # netmask
option broadcast-address 192.168.20.255; #broadcast
host inside {
hardware ethernet 08:00:27:C9:D0:47; #靜態DHCP設定
fixed-address 192.168.20.100;#指定ip
}
}
設定iptables nat,如不做此設定local網路會無法上網
debian:~# echo "1" > /proc/sys/net/ipv4/ip_forward
debian:~# iptables -t nat -A POSTROUTING -s 192.168.20.0/24 -j MASQUERADE
- 單純DHCP:同一區網內,一電腦為DHCP Server,並單純做IP的指派,介面設定為eth0即可
2008年9月15日 星期一
Debian 編譯kernel
編譯kernel所需的套件
debian:~# apt-get install linux-source下載核心
debian:~# apt-get install libncurses5-dev
debian:~# apt-get install bzip2
debian:~# apt-get install gcc
debian:~# apt-get install make
debian:~# apt-get install linux-source-2.6.24設定核心
debian:~# cd /usr/src
debian:/usr/src# tar jxvf linux-source-2.6.24.tar.bz2
debian:/usr/src# cd linux-source-2.6.24/
debian:/usr/src/linux-source-2.6.24# make mrproper編譯核心
debian:/usr/src/linux-source-2.6.24# make menuconfig
debian:/usr/src/linux-source-2.6.24# make安裝核心
debian:/usr/src/linux-source-2.6.24# make modules (模組檔案放在 /lib/modules)
debian:/usr/src/linux-source-2.6.24# make modules_install更新grub
debian:/usr/src/linux-source-2.6.24# make install
debian:/usr/src/linux-source-2.6.24# update-grub核心的編譯非常的耗時,而且編譯出來的核心也不一定能穩定的執行,如非特定需求直接下載安裝編譯好的穩定核心會是比較好的辦法
Debian 解決firefox播放flash影片crash
由於Debian安裝預設的libflash-mozplugin,會無法觀賞youtube的網站,於是到了adobe的官網下載install_flash_player_9_linux.tar.gz的套件並安裝
debian:~# apt-get remove libflash-mozplugin安裝完成後,重新啟動x-window,再開啟firefox會發現yotube的影片可以觀看了,但只要一按到暫停,前進…等的控制項,整個firefox就會crash,上網查詢資料發現是與gcin衝到,非常的神奇,瀏覽器的flash player居然會跟輸入法衝到,因此必需將原本的gcin升級
user@debian:~$ tar zxvf install_flash_player_9_linux.tar.gz
user@debian:~$ cd install_flash_player_9_linux
user@debian:~/install_flash_player_9_linux$ sh flashplayer-installer
最後到Perform another installation? (y/n):,按n離開就安裝完成了
x-window我不太喜歡用root登入,但還是說一下root的安裝法
debian:~# tar zxvf install_flash_player_9_linux.tar.gz
debian:~# cd install_flash_player_9_linux
debian:~/install_flash_player_9_linux# sh flashplayer-installer
Please enter the installation path of the Mozilla, Netscape,
or Opera browser (i.e., /usr/lib/mozilla):
輸入/usr/lib/iceweasel
最後到Perform another installation? (y/n):,按n離開就安裝完成了
debian:~# vi /etc/apt/sources.list重新啟動X-window即可
add
#gcin
deb http://www.calno.com etch-backports main
deb-src http://www.calno.com etch-backports main
debian:~# apt-get update
debian:~# apt-get gcin
更新安裝完成後,再將sources.list新增的部份註解
debian:~# vi /etc/apt/sources.list
fix
#gcin
#deb http://www.calno.com etch-backports main
#deb-src http://www.calno.com etch-backports main
Debian 播放中文mp3
安裝beep media player
- debian:~# apt-get install beep-media-player
- 進入x-window後執行beep media player,滑鼠右鍵->Preferences->Plugins->Output選擇正確的音效驅動程式
- 在Plugins下,Media標籤選擇"MPEG Audio Plugin",並點擊下方的"偏好設定"出現MPEG Audio Plugin Configuration視窗,切換至Title標籤,勾選"Convert nono-UTF8 ID3 Tags to UTF-8",並在"ID3 ecoding:"中輸入"big5","ID3-format:"改成%f
2008年9月14日 星期日
Debian VNC遠端登入KDE with gcin
安裝VNC Server
- 至VNC官方網站(http://www.realvnc.com)下載VNC Enterprise Edition for Linux (x86) Debian Package
- 安裝deb套件,並新增序號
debian:~# dpkg -i vnc-e_4.4.2_i386.deb
debian:~# vnclicense -add xxxxx-xxxxx-xxxxx-xxxxx-xxxxx
- 先執行第一次,產生.vnc/xstartup,停掉VNC Server
user@debian:~$ vncserver
user@debian:~$ vncserver -kill :1 - 設定xstartup後再重開VNC Server
user@debian:~$ vi .vnc/xstartup
fix
x-window-manager &
to
#x-window-manager &
export XMODIFIERS=@im=gcin
gcin &
startkde & #gnome為gnome-session & - 存檔後離開,再執行vncserver
user@debian:~$ vncserver
- 下載VNC Enterprise Edition Viewer for Windows (x86, x64 & ia64)
- 輸入server:vnc number,ex:192.168.20.1:1
- 再輸入Debian本機user的帳號密碼即可登入
2008年9月9日 星期二
Debian 安裝無蝦米scim
參考網站
http://plog.longwin.com.tw/my_note-unix/2007/06/21/install_liu_in_debian_2007
http://plog.longwin.com.tw/my_note-unix/2007/06/21/install_liu_in_debian_2007
- 安裝scim
debian:~# apt-get install scim-chewing
debian:~# apt-get install scim-tables-zh - 切換預設輸入法為scim
user@debian:~$ im-switch -s scim - 取得liu57.cin並製成scim輸入法表格
debian~:# iconv -f cp950 -t utf8 liu57.cin > liu57.cin.utf8
debian~:# vi liu57.cin.utf8
將a A前的標頭全部刪除,並加入以下的內容
### File header must not be modified
### This file must be encoded into UTF-8.
### This file comes from xcin module.
SCIM_Generic_Table_Phrase_Library_TEXT
VERSION_1_0
### Begin Table definition.
BEGIN_DEFINITION
### An unique id to distinguish this table among others.
### Use uuidgen to generate this kind of id.
UUID = 3d872a7a-760e-400c-8b23-688d38390e81
### A unique number indicates the version of this file.
### For example the last modified date of this file.
### This number must be less than 2^32.
SERIAL_NUMBER = 20040922
ICON = /usr/share/scim/icons/liu57.png
### The default name of this table
NAME = Liu5
### The local names of this table
NAME.zh_CN = 嘸蝦米
NAME.zh_TW = 嘸蝦米
NAME.zh_HK = 嘸蝦米
### Supported languages of this table
LANGUAGES = zh_TW,zh_HK,zh_CN,zh_SG
### Prompt string to be displayed in the status area.
STATUS_PROMPT = 中
### If true then the first candidate phrase
### will be selected automatically during inputing.
AUTO_SELECT = FALSE
### If true then a multi wildcard will be appended
### at the end of inputing string automatically.
AUTO_WILDCARD = TRUE
### If true then the result string will be committed to client automatically.
### This should be used with AUTO_SELECT = TRUE.
AUTO_COMMIT = FALSE
### If true then the inputed string will be automatically splitted during inputing.
AUTO_SPLIT = TRUE
### If true then the phrases' frequencies will be adjusted dynamically.
DYNAMIC_ADJUST = TRUE
### If true then the preedit area will be filled up by the current candidate phrase automatically.
AUTO_FILL = FALSE
### If true then the lookup table will always be shown if there is any candidate phrase.
### Otherwise the lookup table won't be shown unless the user requires it by moving the preedit caret left.
ALWAYS_SHOW_LOOKUP = TRUE
### Use full width punctuation by default
DEF_FULL_WIDTH_PUNCT = TRUE
### Use full width letter by default
DEF_FULL_WIDTH_LETTER = FALSE
### The maxmium length of a key.
MAX_KEY_LENGTH = 4
### Valid input chars.
VALID_INPUT_CHARS = ,.'abcdefghijklmnopqrstuvwxyz[]
### Single wildcard char, can have multiple chars.
SINGLE_WILDCARD_CHAR = ?
### Multi wildcard char.
MULTI_WILDCARD_CHAR = *
### The key strokes to split inputed string.
SPLIT_KEYS = space
### The key strokes to commit the convert result to client.
COMMIT_KEYS = space
### The key strokes to forward the inputed string to client.
FORWARD_KEYS = Return
### The key strokes to select candidiate phrases.
SELECT_KEYS = space,v,3,4,5,6,7,8,9,0
### The key strokes to page up the lookup table.
PAGE_UP_KEYS = Page_Up
### The key strokes to page down the lookup table.
PAGE_DOWN_KEYS = Page_Down,space
END_DEFINITION
### Begin Table data.
BEGIN_TABLE
這邊之後才開始接a A,最後到檔案的結尾加入END_TABLE
debian:~# scim-make-table liu57.cin.utf8 -b -o liu57.bin
debian:~# wget http://plog.longwin.com.tw/files/liu5.png
debian:~# mv liu5.png liu57.png
debian:~# cp liu57.png /usr/share/scim/icons
debian:~# cp liu57.bin /usr/share/scim/tables - 重新啟動X即可
Debian 安裝無蝦米gcin
參考網站
http://plog.longwin.com.tw/my_note-unix/2007/08/10/debian_ubuntu_liu5_gcin_2007
Debian 安裝無蝦米輸入法
先切換至要登入x的使用者家目錄下
user@debian:~$ wget http://edt1023.sayya.org/misc/noseeing-6.tar.gz
user@debian:~$ mkdir tmp; cd tmp
user@debian:~$ cp ../noseeing-6.tar.gz .
user@debian:~$ tar zxvf noseeing-6.tar.gz
user@debian:~$ mv noseeing.gtab ~/.gcin #.gcin是目錄,沒有的話要自行建立
重新登入,點選gcin圖示設定內定輸入法為嘸蝦米輸入法即可
Debian install X-window
- 安裝x-window
debian:~# apt-get install xorg
重新安裝virtualbox客端額外功能,安裝完後再重開機,再執行xserver的設定debian:~# dpkg-reconfigure -phigh xserver-xorg
X server driver選擇vboxvideo,解析度選640x480,800x600,1024x768,如要細部設定,直接修改xorg.confdebian:~# vi /etc/X11/xorg.conf
- 安裝輸入法、中文字型
debian:~# apt-get install gcin
將vista正黑體(msjh.ttf)安裝至linux,取得msjh.ttf後放至/usr/share/fonts/truetype/microsoft下,再執行
debian:~# apt-get install im-switch
debian:~# apt-get install ttf-arphic-uming
debian:~# apt-get install ttf-arphic-ukaidebian:~# fc-cache -v
- 安裝KDE桌面管理
debian:~# apt-get install kde-core
debian:~# apt-get install kde-i18n-zhtw - 音效
debian:~# apt-get install alsa-base
debian:~# apt-get install alsa-utils
debian:~# alsaconf
debian:~# apt-get install kmix
user@debian:~$ im-switch -s gcin之後只要在一般使用者下執行startx即可進入x-window,強烈建議不要使用root登入
user@debian:~$ LANG=zh_TW.UTF-8
user@debian:~$ LANGUAGE=zh_TW:zh
user@debian:~$ startx
Debian 掛載範例
掛載FAT:
debian:~# mount -t vfat -o nls=cp950 /dev/hda5 /mnt/win98
掛載ISO:
mount -o loop /root/ data.iso /media/cdrom
/etc/fstab下的寫法
/root/data.iso /root/share iso9660 loop,user,noauto 0 0
掛載NTFS-3G
mount -t ntfs-3g -o locale zh_TW.UTF-8 /dev/hda3 /mnt/xp
debian:~# mount -t vfat -o nls=cp950 /dev/hda5 /mnt/win98
掛載ISO:
mount -o loop /root/ data.iso /media/cdrom
/etc/fstab下的寫法
/root/data.iso /root/share iso9660 loop,user,noauto 0 0
掛載NTFS-3G
mount -t ntfs-3g -o locale zh_TW.UTF-8 /dev/hda3 /mnt/xp
2008年9月8日 星期一
9/22~9/26教召
退伍快兩年了,第一次教召,時間是9/22~926...一般兵不是四天嗎?怎麼會是5天....
上了一些網站看一下,查到突然發現後備同心演習的資料...
http://thinktank.nat.gov.tw/ct.asp?xItem=19891&ctNode=78&mp=1
同心演習
本部依國軍「漢光24號」演習想定指導架構,於實兵操演階段,循國土防衛作戰之程序,策劃動員演習課目,採「全島、分區、同時」方式,循「聯合戰力保 存」、「聯合截擊」、「國土防衛」作戰階段,演練動員前運後備部隊、滲透運補、輜重開設以及反空(機)降作戰、山隘、城鎮與海岸守備等作戰演練課目,於4 月24日策頒演習訓令,預於97年9月22至26日結合「漢光24號」實兵操演階段實施,本次動員演習後備參演兵力概約2萬3,500人。
GOD!我的運氣還真是好啊...
不過我還在職訓局的網工班上課說,不知道能不能緩徵...
畢竟職訓局的課程一週沒上會落後非常的多8*5=40hr,而且事關就業輔導的課程!
年年有演習,時時能教召,但我的課程就不是這麼一回事了!
明天教召令寄到手上再去問問看吧!天啊...
Debian 讀取、寫入 NTFS,並讓遠端支援中文
要能讓Debian讀取並能寫入NTFS必需安裝NTFS-3G,先下載Stable Source Release 1.2812版本並安裝
debian:~# wget http://www.ntfs-3g.org/ntfs-3g-1.2812.tgz掛載XP
debian:~# tar zxvf ntfs-3g-1.2812.tgz
debian:~# cd ntfs-3g-1.2812
debian:~/ntfs-3g-1.2812# ./configure
debian:~/ntfs-3g-1.2812# make
debian:~/ntfs-3g-1.2812# make install
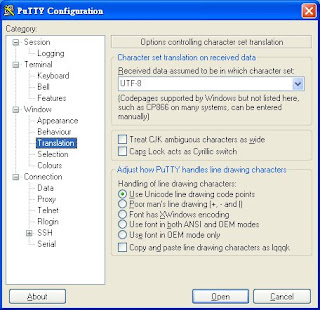
debian:~# mount -t ntfs-3g -o locale=zh_TW.UTF-8 /dev/hda3 /mnt/xp再利用putty對主機進行連結,唯一要額外改的設定為將Window->Translation下的語系設定改成UTF-8,即可在putty下遠端顯示NTFS的中文並修改

2008年9月6日 星期六
Debian 多重開機
hda1:Debian
hda2:swap
hda3:WinXP
hdb1:WinXP_2
hda2:swap
hda3:WinXP
hdb1:WinXP_2
- 使用boot.ini管理,需要建立與Debian連結的系統檔
- 在Debain下建立bootsect.lnx:
需先將bootsect.lnx備份至隨身碟,再進入WinXP後再將bootsect.lnx拷貝至c:\
debian:~# dd bs=512 count=1 if=/dev/hda2 of=bootsect.lnx - 在WinXP下建立bootseet.lnx:
下載dd for windows (http://www.chrysocome.net/dd) ,將dd.exe解壓至c:\下,開始->執行cmd進入命令提示字元,執行
c:\>dd count=1 bs=512 if=\\?\Device\Harddisk0\Partition0 of=bootsect.lnx
(hda1\\?\Device\Harddisk0\Partition0=hda1)會產生一個bootsect.lnx的檔案
編輯c:\boot.ini(需打開隱藏檔,或是我的電腦->滑鼠右鍵內容->進階->啟動及修復(設定)->編輯)
add
c:\bootsect.lnx="Debian GNU/Linux"
multi(0)disk(0)rdisk(1)partition(1)\WINDOWS="Microsoft Windows XP Professional_2" /noexecute=optin /fastdetect - 在Debain下建立bootsect.lnx:
- 使用GRUB管理
修改/boot/grub/menu.lst
add
title WinXP
root (hd0,2)
makeactive
chainloader +1
title WinXP_2
root (hd1,0)
map (hd1) (hd0) ##不加這兩行會出現
map (hd0) (hd1) ##Filesystem type unknown, partition type 0x7錯誤訊息
makeactive
chainloader +1 - XP MBR 救援
利用XP光碟開機,並按R進入復原主控台,選擇好要登入的Windows及輸入Administrator密碼後會進至C:\WINDOWS>,執行
C:\WINDOWS>fixmbr
你確定要寫入一個新的MBR嗎?y
C:\WINDOWS>exit
重開機即可 - GRUB MBR救援
debian:~# grub
grub> root (hd0,0)
grub> setup (hd0)
grub> quit
或是直接執行
debian:~# grub-install /dev/hda
也可使用救援光碟如Koppixx開機後,先將/dev/hda1掛載,再利用chroot切換至原系統,再將GRUB寫入MBR
root@0[root]# mount /dev/hda1 /mnt/hda1
root@0[root]# chroot /mnt/hda1
Knoppix:/# grub-install /dev/hda1
2008年8月30日 星期六
Debian 更換網卡 eth1 2 3 4修正
在更換網卡後,會發現怎麼無法對eth0設定,輸入
debian:~# ifconfig -a
會發現eth0不見了,變成eth1
Debian只要在網卡的mac有變更就會新建一個裝置名稱,並將原本的註解停用,例如原本的網卡是eth0,但你只要換了一片網卡,就會變成eth1,會造成使用的不便,例如在iptables設定原則有用到eth0的部份,可能就失效了
debian修正的方式,編輯/etc/udev/rules.d/z25_persistent-net.rules
debian:~# vi vi /etc/udev/rules.d/z25_persistent-net.rules
fix
debian:~# ifconfig -a
會發現eth0不見了,變成eth1
Debian只要在網卡的mac有變更就會新建一個裝置名稱,並將原本的註解停用,例如原本的網卡是eth0,但你只要換了一片網卡,就會變成eth1,會造成使用的不便,例如在iptables設定原則有用到eth0的部份,可能就失效了
debian修正的方式,編輯/etc/udev/rules.d/z25_persistent-net.rules
debian:~# vi vi /etc/udev/rules.d/z25_persistent-net.rules
fix
# PCI device 0x8086:0x100e (e1000)to
#SUBSYSTEM=="net", DRIVERS=="?*", ATTRS{address}=="08:00:27:17:2b:b2", NAME="eth0"
# PCI device 0x8086:0x100e (e1000)
SUBSYSTEM=="net", DRIVERS=="?*", ATTRS{address}=="08:00:27:17:3b:42", NAME="eth1"
# PCI device 0x8086:0x100e (e1000)可以看到目前使用的eth1設定及之前eth0的mac設定,但之前的eth0被註解了,把之前eth0的部份刪除,再把"eth1"改為"eth0",存檔後重開機就ok了
SUBSYSTEM=="net", DRIVERS=="?*", ATTRS{address}=="08:00:27:17:3b:42", NAME="eth0"
Linux 文字模式下的亂碼
因為安裝時所使用的語系是中文的,所以在英文語系的環境下,會造成亂碼
只要打指令
id@debian:~$ export LC_MESSAGES=C
id@debian:~$ export LC_TIME=C
程式輸出訊息與時間輸出都是使用英文語系
下面這招是之前和小州老師學的,$DISPLAY是用來判斷有沒有執行X環境
id@debian:~$ vi ~/.bash_profile
add
只要打指令
id@debian:~$ export LC_MESSAGES=C
id@debian:~$ export LC_TIME=C
程式輸出訊息與時間輸出都是使用英文語系
下面這招是之前和小州老師學的,$DISPLAY是用來判斷有沒有執行X環境
id@debian:~$ vi ~/.bash_profile
add
if [ -z "$DISPLAY" ]; then
export LC_MESSAGES=C
export LC_TIME=C
fi
Debian vi及ls 彩色顯示
vi及ls堪稱linux最常用的指令,在有彩色顯示的方式下,更可以增強閱讀性
- ls
編輯家目錄下的.bashrc
id@debian:~$ vi .bashrc
remove remark
alias ls='ls --color=auto'
alias ll='ls -l'
alias la='ls -A'
alias l='ls -CF'
將上列4行的#拿掉,重新登入,設定就會生效,假如是遠端登入要再重登覺得麻煩可以使用source,一樣可以生效
id@debian:~$ source .bashrc
root也可以編輯/etc/skel/.bashrc,讓以後新增的使用者,可以直接套用此設定
debian:~# vi /etc/skel/.bashrc
remove remark
alias ls='ls --color=auto'
alias ll='ls -l'
alias la='ls -A'
alias l='ls -CF' - vi
安裝vim
debian:~# apt install vim
修改/etc/vim/vimrc
fix"syntax on
tosyntax on
Virtualbox Bridge ADSL 動態ip 上網 guest OS Debian
因為ADSL是採用pppoe的撥接方式獲得真實的ip,而ip是動態的,即每次撥接有可能會更動ip,為了讓該guestos的ip即使在動態下仍然能被外部找到,必需依靠動態dns,我要使用的是no-ip的服務
- ADSL 動態ip
在區域網路和主端介面橋接後,建議將網路橋接器設定ip(只要設定ip及netmask),guest OS也是,避免開機時因為尋找ip而增加開機時間,同時也讓Host OS及guest OS在同一區網內
#debian:~# vi /etc/network/interfaces
fix eth0 setauto eth0
安裝pppoeconf
iface eth0 inet static
address 192.168.20.1
netmask 255.255.255.0
#debian:~# apt-get install pppoeconf
安裝完成後執行pppoeconf開始設定pppoe連線
#debian:~# pppoeconf
ALL DEVICES FOUND?:一般而言guest OS只有一片網卡,選yes
POPULAR OPTION:選YES
ENTER USERNAME:輸入pppoe帳號
ENTNER PASSWORD:輸入pppoe密碼
USE PEER DNS:是否自動蓋過resolv.conf,如果有自訂DNS的話建議為否
LIMITED MSS PROBLEM:選yes
DONE:是否開機直接執行:選yes
ESTABLISH A CONNECTION:選yes
CONNETCION INITIATED:設定完成,直接連線
如果要將pppoe斷線,執行:
#debian:~# poff
如果要將pppoe再連線,執行:
#debian:~# dsl-provider
如果要把開機就連線取消的話,要修改/etc/network/interfaces
#debian:~# vi /etc/network/interfaces,將開啟連線的指令remark就行了
fixprovider dsl-provider
to#provider dsl-provider
如果會無緣無故斷線可以用plog來看斷線的原因
debian:~# plog
No response to 4 echo-requests
Serial link appear to be disconnected.
Connect time 4.5 minutes.
如有有檢查到上面的訊息就代表icmp的echo-request出了問題,必需在/etc/ppp/options下做修正
debian:~# vi /etc/ppp/options
lcp-echo-interval 30
lcp-echo-failure 4
系統每30秒會ping adsl server,4次如果都沒有回應就會將連線斷掉30*4=120秒,首先檢查iptables是否有檔掉Echo Reply及Echo Request,如果不是防火牆的問題,可以試著將lcp-echo-failure的值調高 - no-ip動態dns
先至http://www.no-ip.com註冊,在YOUR NO-IP0>Hosts / Redirects->Add,Hostname填寫好及Host Type選擇DNS(A),直接按最底下的Create Host就建立完成
回到guest OS的Debian上,安裝no-ip客戶端
#debian:~# apt-get install no-ip
安裝no-ip後,開始設定
#debian:~# no-ip -C
Auto configuration for Linux client of no-ip.com.
Multiple network devices have been detected.
Please select the Internet interface from this list.
By typing the number associated with it.
0 eth0
1 ppp0
1 //選擇1 ppp0
Please enter the login/email string for no-ip.com your-mail@ your-mail.com //輸入註冊的信箱
Please enter the password for user 'your-mail@ your-mail.com' *********** //輸入密碼
2 hosts are registered to this account. //因為我有兩個host設定才會出現,必需選擇要更新那一個
Do you wish to have them all updated?[N] (y/N) n
Do you wish to have host [w1.myftp.biz] updated?[N] (y/N) y
Do you wish to have host [w2.myftp.org] updated?[N] (y/N) n
Do you wish to run something at successful update?[N] (y/N) n
New configuration file '/etc/no-ip.conf' created.
之後只要連線到w1.myftp.biz就可以直接連線到guest OS了,如果因為guest OS重新開機而造成dns未更新的情況下只要輸入
c:\ipconfig /flushdns
就能將dns的cache清除,使用pppoe+動態DNS,建議開機時就直接連線,因為pppoe取得的為真實ip,所以外部的電腦可以直接連線至guest OS上
Virtualbox Bridge 上網 guest OS Debian
virtualbox要使用橋接模式,只要在配接卡上選擇附掛到主端介面即可,如果沒有主端介面,必需自行建立,橋接上網因為連線的型態可以分為三種:
- 區網固定IP
- IP分享器DHCP
- ADSL 動態ip
- 區網固定IP
將Host OS設定為固定ip的區域網路及主端介面橋接,將網路橋接器設定為原本Host OS的區域網路ip設定,guest OS將eth0的設定改過為同區網內未使用的ip即可
#debian:~# vi /etc/network/interfaces
fix eth0 setauto eth0
dns則要到/etc/resolv.conf下設定,由於是真實ip所以可以達成外部直接連線至guest os的方法
iface eth0 inet static
address 211.74.33.12
netmask 255.255.255.0
gateway 211.74.33.254 - IP分享器DHCP
區域網路和主端介面橋接後,將網路橋接器設為自動取得ip,guest os一樣
debian:~# vi /etc/network/interface
fix eth0 setauto eth0
因為都是ip分享器所給予的Private IP,所以外部並無法直接連線至guest OS,必需靠IP分享器設定port mapping 連線至guest OS上的特定服務
iface eth0 inet dhcp - ADSL 動態ip
因為要牽扯到動態dns,篇幅較長,整理到下一篇
Virtualbox NAT 上網 guest OS Debian
只要在網路配接卡上選擇附掛到NAT,並修改/etc/netowrk/interfaces下網卡的設定
#debian:~# vi /etc/network/interfaces
fix eth0 set
#debian:~# vi /etc/resolv.conf
add
#debian:~# vi /etc/dhcp3/dhclient.conf
fix
#debian:~# vi /etc/network/interfaces
fix eth0 set
auto eth0由於Debian利用DHCP所取得的DNS為10.0.2.3,無法做用,只好手動將DNS加入/etc/resolv.conf
iface eth0 inet dhcp
#debian:~# vi /etc/resolv.conf
add
nameserver 168.95.1.1但只要重開機或重新取得ip,namserver的資料都會被洗掉,相當不方便,但有另一個方法,只要編輯/etc/dhcp3/dhclient.conf下的prepend,將#拿掉必更改成自己要的DNS,之後只要重新取得ip會自動在resolv.conf前加上自訂的nameserver
#debian:~# vi /etc/dhcp3/dhclient.conf
fix
#prepend domain-name-servers 127.0.0.1;to
prepend domain-name-servers 168.95.1.1;由於NAT的特性,雖然可以上網,但別人要對應到guest OS則必需使用NAT Port Forwarding
2008年8月29日 星期五
Virtualbox 進階功能 guest OS Debian
- 分享資料夾(需先安裝客戶端)
vboxsf:type
share_folder_name:設定的分享資料夾的名稱
/mnt/share:掛載點
debian:~# mount -t vboxsf share_folder_name /mnt/share - NAT Port Forwarding
setextradata:虛擬機器名稱
Devices:網路卡名稱/序號,ex: 網卡1 pcnet/0,網卡2 e1000/1
Config:設定名稱
Protocol:TCP,UDP
GuestPort:GuestOS的port
HostPort:HostOS的port
要移除將Protocol、GuestPort、HostPort值取清,再重新執行一次
HostOS為WinXP,GuestOS為Debian
在WinXP下,開始->執行 cmd->切換目錄至C:\Program Files\Sun\xVM VirtualBox,以下的範例為將HostOS的port 2222對應到GuestOS的port 22,執行完後需將GuestOS關機再重開,此時外部的電腦只要連線至 HostOS_IP_add port 2222即可連結至GuestOS的ssh服務。
Add ssh
VBoxManage setextradata "Debian" "VBoxInternal/Devices/pcnet/0/LUN#0/Config/ssh/Protocol" TCP
VBoxManage setextradata "Debian" "VBoxInternal/Devices/pcnet/0/LUN#0/Config/ssh/GuestPort" 22
VBoxManage setextradata "Debian" "VBoxInternal/Devices/pcnet/0/LUN#0/Config/ssh/HostPort" 2222
Remove ssh
VBoxManage setextradata "Debian" "VBoxInternal/Devices/pcnet/0/LUN#0/Config/ssh/Protocol"
VBoxManage setextradata "Debian" "VBoxInternal/Devices/pcnet/0/LUN#0/Config/ssh/GuestPort"
VBoxManage setextradata "Debian" "VBoxInternal/Devices/pcnet/0/LUN#0/Config/ssh/HostPort"
Debian aptitude
Debian aptitude
按下Ctrl+T或是F10即可進到選單
Options->Dependency handling->Install Recommended packages automatically取消
常用指令
按下Ctrl+T或是F10即可進到選單
Options->Dependency handling->Install Recommended packages automatically取消
常用指令
- "/" 搜尋 ,"n"下一個,"\"前一個
- "u"更新列表
- "U"標準更新"
- "+"安裝
- "-"移除
- "_"設定檔一併移除
- "A"自動安裝
- "h"不更新
- "v"虛擬套件
- "m"手動安裝
- "g" go
debian:~# reset
Debian 忘記root密碼
- 在一開始GRUB畫面選擇(single-user mode),按下"e"編輯
- 移至kernel那行,再按下"e"編輯
fixro single
torw single init=/bin/bash
- 進入"root@(none):/#"模式,直接修改root密碼即可
root@(none):/# passwd
Debian qe 設繁體中文設定
qe為彷dos時代pe2的文字編輯軟體,支援中文,如果有使用過pe2的人一定會感到相當的懷舊!
- 先確定是否有安裝zh_TW BIG5語系
debian:~# dpkg-reconfigure locales
安裝zh_TW BIG5,按下ok,出現Default locale for the system environment:,選擇"none" - 利用apt-get或是aptitude安裝qe
debian:~# apt-get install qe - 將目前語系改成zh_TW
debian:~# LANGUAGE = zh_TW - 執行zhcon(需先載入vgafb16),再執行qe即可
debian:~# zhcon
debian:~# qe
Debian zhcon 設定
- 修改/etc/zhcon.conf
fixdefaultencode = gb2312
todefaultencode = big5
- 需先載入vga16fb module,有兩種方法
- 開機後手動載入
debian:~# modprobe vga16fb - 開機就載入
debian:~# vi /etc/modules
add
vga16fb
save&exit,重開機後就會自動載入
- 開機後手動載入
- 執行zhcon,telnet ptt.cc測試,按下Ctrl+d或exit離開zhcon
debian:~# zhcon
Debian apt-get mirror
編輯/etc/apt/sources.list
debian:~# vi /etc/apt/sources.listadd
deb http://ftp.tw.debian.org/debian/ etch main non-free contrib存檔後離開,如果線上安裝有問題要先執行更新
deb-src http://ftp.tw.debian.org/debian/ etch main non-free contrib
debian:~# apt-get update
Virtualbox在Debian客戶端安裝法
在安裝客戶端必需先安裝的套件
debian:~# apt-get update
正常安裝法將客戶端光碟掛載,並安裝,完成後重開機即可安裝目前使用的kernel的header,可由uname -r得知版本懶人安裝法
debian:~# apt-get install linux-headers-2.6.18-6-686
debian:~# apt-get install make
debian:~# apt-get install gccdebian:~# apt-get install module-assistant
debian:~# m-a prepare
debian:~# mount /dev/cdrom /media/cdrom
debian:~# cd /media/cdrom
debian:~# sh VboxLinuxAddition.run
2008年8月26日 星期二
超差的服務
上網拍買了一組持續供墨系統,帶回家安裝發現有問題!
可是換回原廠的墨匣就ok,換上網拍買的就不能使用,於是將貨品寄回去!
今天中午店家打電話來了
「晶片經我們證實,是沒有問題的。」
『真的沒有問題嗎?』
「你要不要把印表機直接帶來店面,看你的住址滿近的。」
『不太方便喔,我沒有交通工具可以載得動複合機』
「你不帶來的話,我們寄一次要$60,而且到時你又再說晶片不合又要再寄,成本不合,那東西很好安裝的...」
『那直接寄回來吧,麻煩附上更清楚的教學說明!』
「再見!」
服務真的是超差的,我當然知道不難,以前我也裝過類似的供墨系統,裝上你賣的就不能用,換回原廠的就ok,寄回到你那又可以使用,不是很怪嗎?
更扯的是還開口說郵費$60不合,我把東西寄回去給店家還自己貼了$70的郵資都沒再叫了!
還一直說簡單簡單,說附的說明書做的很詳盡!老王賣瓜真的是自賣自誇!
我從來沒裝過,沒裝成功,被你說的因為說明書教的很清楚,好像都是我的問題一樣,超惡質的客服,真的是超差的店家,說住址不遠希望我自己送來!我就是沒汽車可載~~
如果真的很近的話麼不到府裝修,算了,這就是連$60郵資都計較的店家客服~~~
和他要更清楚的說明,也不回答好不好o不ok,就直接說再見掛電話,GOOD GOB!
如果寄回來的時候會附上更清楚的說明,等著接一個超大的負評吧!難得遇到超不會做生意的網拍客服!
2008年8月25日 星期一
最近的生活一團亂..
參加了網工班,似乎以前大學時念書念到二一沒念到書的份都給補回來了,對於網路這一塊,我是真的有相當的興趣,每天唯一的休息就剩下看緯來日本台的日劇,即使是看日劇我還是NoteBook在身旁,查詢著我想找的資料,這似乎和以前玩wow一樣,我只要遇到自己喜歡或是想做的事就會投入相當大的時間,或許這就是我宅的原因吧!…囧
每次突然想到該洗澡了,把手移開notebook的鍵盤,抬頭看一下時鐘,什麼...又00:00了,生活一團亂,垃圾好像快兩個星期沒拿去倒了,養的楓葉鼠也是發現他們的家發出臭味,才勉強的動一下幫他們清理一下,好像一個月沒打掃房間了,每天都沉在0與1的世界中,不過比玩wow起來,我可以慶幸的說,至少這是學起來對未來很有幫助的東西XD
但生活真的是一團亂啊.....如果我有$$我一定會請個管家的,明明知道一團亂還是提不起勁去整理...ZZZ
每次突然想到該洗澡了,把手移開notebook的鍵盤,抬頭看一下時鐘,什麼...又00:00了,生活一團亂,垃圾好像快兩個星期沒拿去倒了,養的楓葉鼠也是發現他們的家發出臭味,才勉強的動一下幫他們清理一下,好像一個月沒打掃房間了,每天都沉在0與1的世界中,不過比玩wow起來,我可以慶幸的說,至少這是學起來對未來很有幫助的東西XD
但生活真的是一團亂啊.....如果我有$$我一定會請個管家的,明明知道一團亂還是提不起勁去整理...ZZZ
2008年8月10日 星期日
魔獸紙模型DIY
在巴哈姆特的魔獸世界討論區先是看到了
【閒聊】紙模型動手做!(有成品看唷)
被裡面許許多多的紙模式心動了一下,又看到了另一外大大的
【心得】製作真實魔獸模型一日遊!! 新增獸人&矮人郵箱
看了之後有一種蠢蠢欲動的感覺~~~
這週末比較有空,於是就去採買了一些工具!
1.雕刻刀
2.墊子
3.鐵尺
2.125gsm的A4紙
今天下午於是就用印表機開開心心的把模型物件圖給印了下來,然後就一路開始做....做到1/2時發現整個黏反了,於是整個揉掉,抱著超疲累的心情跑去睡個午覺。
晚上吃飽後,心有所不甘於是再挑戰一次,這次就很順一次就做完了,底下是成品圖。

側面圖

正面圖

開箱圖
藏寶箱有數字標記告訴你要黏那裡,會切掉的數字標記我會在元件後面用鉛筆寫數字,有些地方真的很難黏,突然想到小學時有一種可以做出立體恐龍模式的勞作,不過寶藏箱小太多了,真的是要實際去做才知道好難啊,裁切都是個難度,黏貼又是個難度...我覺得我的MP快見底了,不過做出來真的滿有成就感的,滿有趣的,本來一開始想要做烏鴉領主的,不過做完這個藏寶箱後,我有一種縮起來的感覺XD,有機會再討戰鳥鴉領主吧。
訂閱:
文章 (Atom)